Development
Nowadays, there are multiple ways to develop for the Amiga platform.
- Assembler
- C
- AmiBlitz
- Scorpion Engine
- ...
On this page, I will focus on C development.
Alternative 1: VS Code / gcc
If you can start over from scratch, I would suggest using the cross-development environment for VS Code / gcc Amiga-Dev
Alternative 2: SAS/C
If you cannot use alternative 1, you can set up a cross-development environment by hand with the compiler of your choice. Not as nice as the solution above, but it's working rather well.
Prerequisits
- WinUAE
- Git
- Visual Studio Code
- Task Runner - Plugin
- Amiga Kickstart-Rom e.g. Amiga Forever
- Amiga OS
- Amiga C-Compiler e.g. SAS/C
- Native Development Kit
Copy Amiga Kickstart-ROMs
Copy all Kickstart-ROMs to a directory of your choice. As an example, we copy them to:
e.g. C:\Development\KickromsCreate a workspace
Create a directory that will be mounted as a hard drive where your codebase will remain.
e.g. C:\Development\WorkspaceInstall WinUAE
First, download WinUAE and install it on your local System.
e.g. C:\Development\WinUAEStart WinUAE-GUI: Path-of-installation/WinUAE.exe
Configure WinUAE
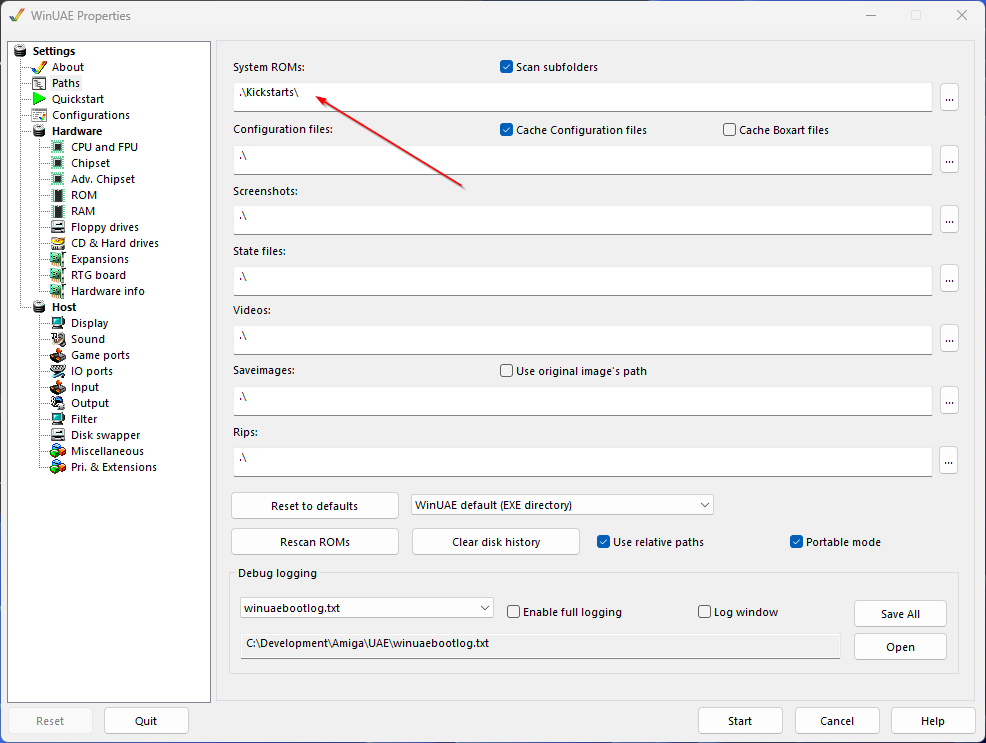
WinUAE: Define Paths
First, you have to define where the Kickstart-Roms are located.
WinUAE: Define target system
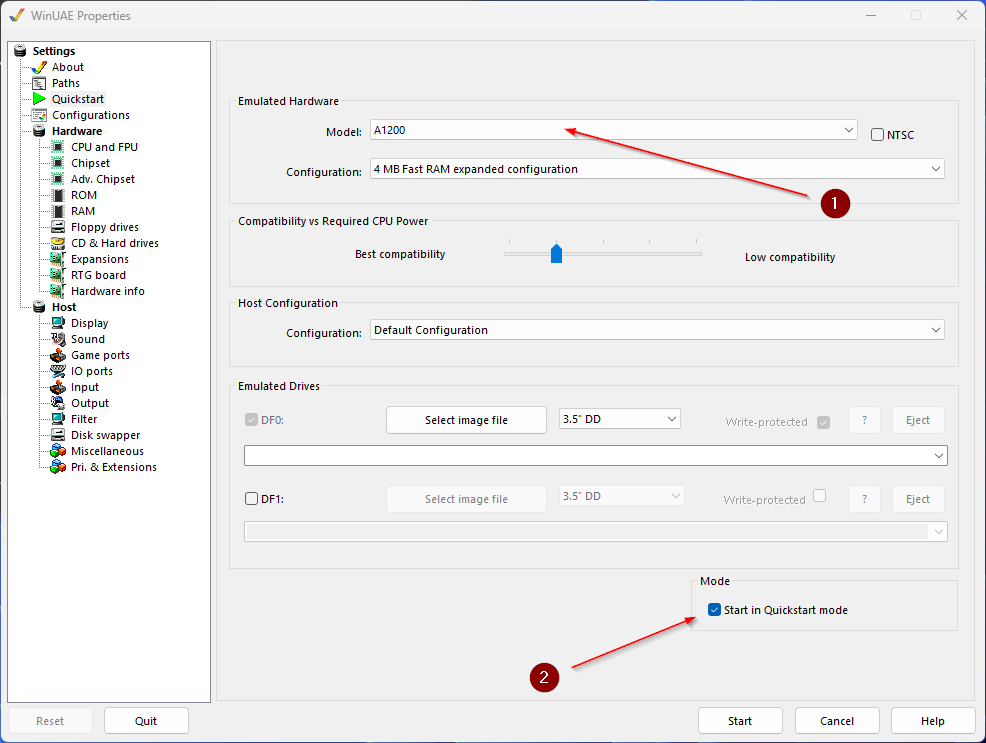
In the menu 'Quickstart' you can define which type of Amiga you want to use. (1) This will make some default configuration for you.
I selected the A1200
On the bottom of this configuration page, enable the quick-start option. This will lead to a shorter boot time for the Amiga. (2)
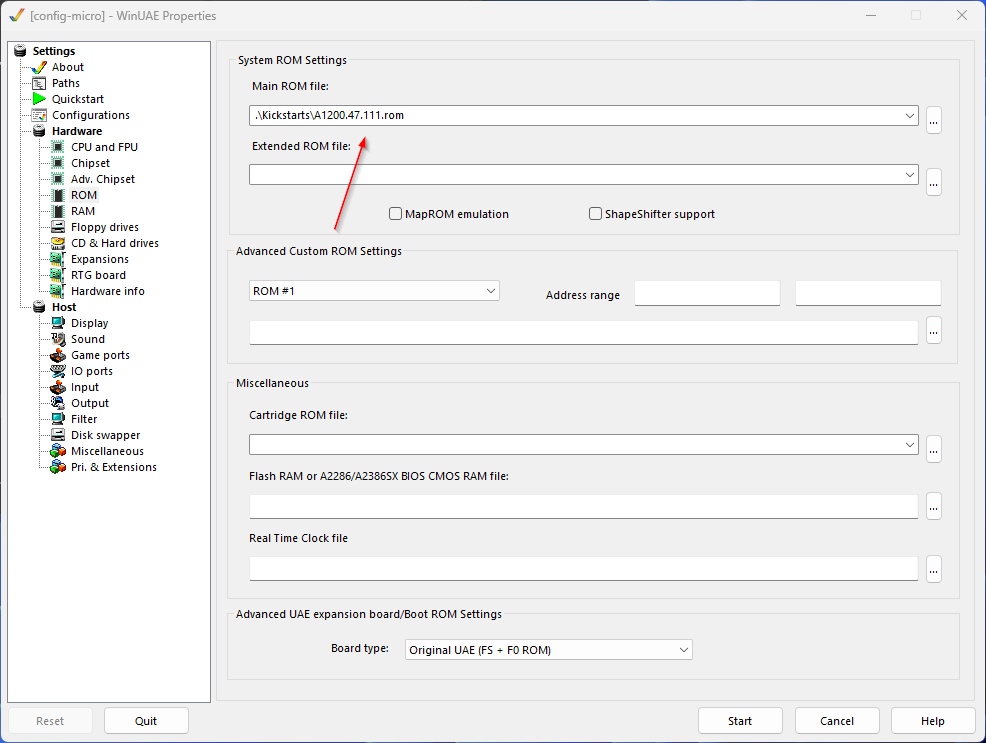
WinUAE: Select the kickstart ROM
Now select the Kickstart ROM, which should be used. It should match the target Amiga system, which you defined in the previous step.
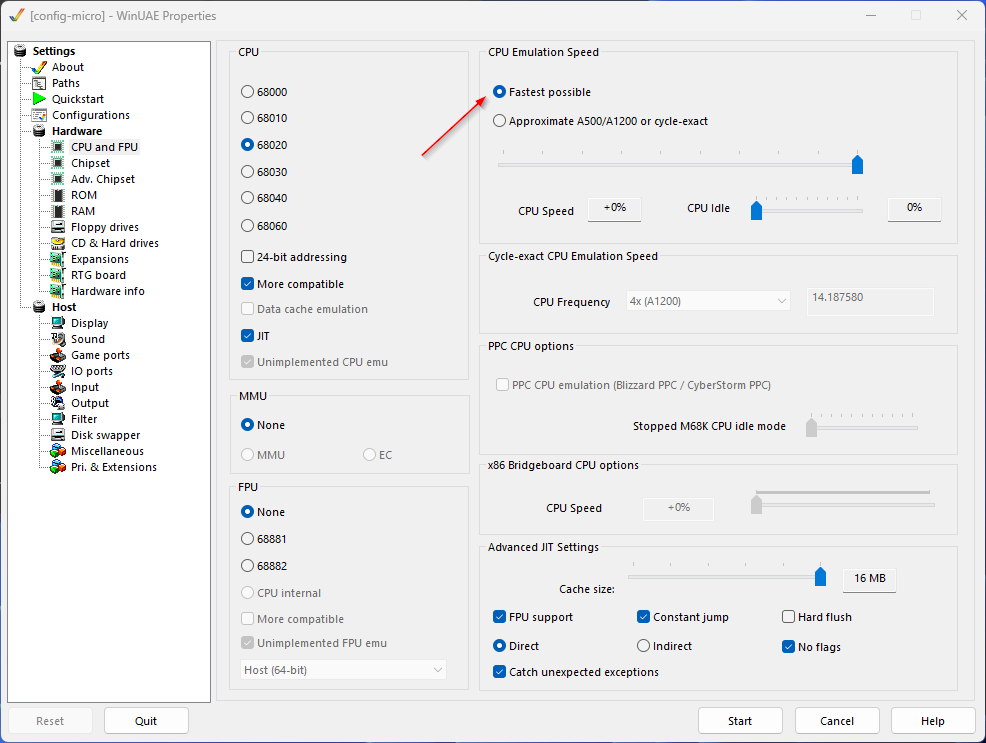
WinUAE: CPU
To speed up the boot time, set the CPU speed to the maximum. That will also speed up the compilation time. But keep in mind that the Amiga will not behave as a real Amiga. For testing, you should set an accurate CPU speed.
WinUAE: Define Hard Drive
Now we set up the hard drives of the Amiga. We will define two hard drives
- Hard drive for the system. e.g. Workbench. From this hard drive the system will boot.
- Select 'Add Hard Drive'
- Select dh0
- Choose a name, e.g. 'System'
- Make the hard drive bootable
- Define the size. ~100 MB should be enough.
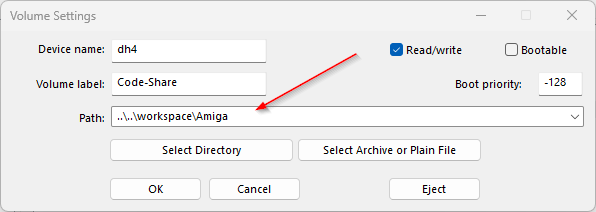
- Hard drive for development Now we define a second hard drive, where you will have access to your code.
- Select 'Add Directory or Archive'
- Choose the folder you created before on the Windows system. e.g. C:\Development\Workspace
- Choose a name, e.g. 'Development'
On the Amiga side you will see the content of this folder as content of the hard drive. This is the place where you will edit the code on the Windows system and compile it on the Amiga.

WinUAE: Save the configuration
Choose a name and save it.
e.g. 'Dev'Amiga: Install Amiga-System
Now you need to install the Amiga-System. There are several installation guides on the internet. That's why I won't explain it here. After installing the Amiga system, make sure you can boot AmigaOS and you should see both Hard drives.
Amiga: Install SAS/C
Install SAS/C and follow the instructions. As the target path, choose a location that is accessible for Windows and the Amiga system.
e.g. C:\Development\Workspace\SDKAmiga: Install NDK
Install NDK and follow the instructions. As the target path, choose a location that is accessible for Windows and the Amiga system.
e.g. C:\Development\Workspace\NDKWindows: Install Visual Code Studio
- Install the tool in a location of your choice.
- Start VS Code
- In extensions, search for 'Task Runner' by Sana Ajani and install the plugin.
VS Code: Configure VS Code
In your .vscode folder, you will need three files
- settings - Exclude files from workspace
- c_cpp_properties.json - Path to SASC/INCLUDES
- task.json - Define tasks to start/end WinUAE
VS Code: settings.json
The SAS/C compiler will create many files, that will be of no use for coding with VS Code. To reduce the displayed files in your workspace, exclude the unnecessary files.
{
  "files.exclude": {
    "**/*.info": true,
    "**/*.INFO": true,
    "**/*.o": true,
    "**/*.lnk": true,
    "BUILD.INFO": true,
    "DEBUG": true,
    "DEBUG.INFO": true,
    "EDIT.INFO": true,
    "FIND.INFO": true,
    "SCOPTIONS": true,
    "SCOPTIONS.INFO": true
  },
  "files.associations": {
    "*.c": "cpp",
    "*.H": "cpp",
    "smakefile": "plaintext"
  },
  "[plaintext]": {
    "editor.formatOnSave": false
  },
  "C_Cpp.clang_format_fallbackStyle": "{ BasedOnStyle: Google, IndentWidth: 4, ColumnLimit: 0}",
  "C_Cpp.clang_format_sortIncludes": false,
  "cmake.configureOnOpen": false
}
VS Code: c_cpp_properties.json
Add the SAS/C includes to the includePath.
"configurations": [
        {
            "name": "Win32",
            "includePath": [
                "${workspaceFolder}/**",
                "C:\\Development\\Workspace\\SDKC\\SC\\INCLUDE\\**"
            ],
VS Code: Define tasks.json
In tasks.json you define tasks for the task runner plugin. We define two tasks. One to start WinUAE and one to stop it.
{
  "version": "2.0.0",
  "tasks": [
    {
      "label": "Start UAE",
      "type": "shell",
      "command": "Taskkill /IM winuae64.exe /F ; C:/Development/WinUAE/winuae64.exe -f dev.uae -G",
      "presentation": {
        "echo": true,
        "reveal": "always",
        "focus": false,
        "panel": "shared",
        "showReuseMessage": false,
        "clear": true
      }
    },
    {
      "label": "Stop UAE",
      "type": "shell",
      "command": "Taskkill /IM winuae64.exe /F",
      "presentation": {
        "echo": true,
        "reveal": "always",
        "focus": false,
        "panel": "shared",
        "showReuseMessage": false,
        "clear": true
      }
    } // More tasks here, if you need them.
  ]
}
INFO
"Taskkill /IM winuae64.exe /F ; C:/Development/WinUAE/winuae64.exe -f dev.uae -G",
C:/Development/WinUAE/winuae64.exepath to the WinUAE executeabledev.uaeThe name of the WinUAE configuration
You should see the tasks in the lower-left corner under "Task Runner". You might need to restart VS Code.
If everything's working as intended, you can code in VS Code and start WinUAE to boot into AmigaOS and compile the code by opening a shell. Switch to the Hard drive where the code is located.
cd DH1:
sc link testfile.c
Bonus
Create multiple WinUAE files
We just created a configuration to speed up the booting and compilation as fast as possible. If you want to test under more realistic configurations, create additional WinUAE configs. Now you can add additional tasks for the task runner loading different configurations for, e.g., testing.
AmigaOS: MultiBoot
On the Amiga side, you can create multiple startup-sequences and control them while booting by pressing a combination of the mouse buttons. I made e.g. three startup-sequences
- No mouse button pressed: Boot into WB, compile matchball and start it
- Right mouse button pressed: Just boot into Workbench
- Left mouse button pressed: Boot into shell (minimal setup)
You can use e.g. BootManager
AmigaOS: Redirect the compilation logs into a file
If you pass the output of the compilation into a file, you can access it with VS Code. Makes the debugging easier (especially if you crash the system)
e.g.
cd Matchball-Share:
Sys:c/delete #?.o #?.q #?.tmp Matchball
Sys:c/delete Development:output.txt
stack 150000
smake -a >Development:output.txt